For anyone using the search how to add their player face texture ingame. Note that this guide is for PC only!
NOTE: You can NOT import faces for created players or players generated in-game, i.e youth academy players. This means a real player must be replaced.
- Use Live Editor to make note of the player ID you want to replace.
- Launch FIFA Editor Tool.
- On your left hand-side, below the ‘Data Explorer’ tab highlighted in purple. Enter your chosen player’s ID in search.
- You will find your chosen player’s folder in this naming convention i.e. mitch_langerak_182435 – click on it.
- Right click on var_0, and click Import Face.
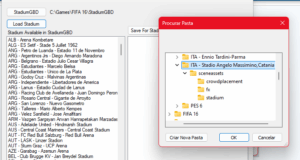
- Select your folder containing the .fbx & .tga of your player face.
- Lastly, you will be prompted to select a skeleton. Click the [+] within the window, then follow down this path: Content > Character > Rig > Skeleton > Player.
- Click Import once you’ve completed Step 7.
- You can now export this as a mod. File > Export to Mod.
- Enjoy your face in-game by adding this mod to your Mod Manager.